4Runner Scuba Mod
Mechanical engineering is a subject of fascination for me. By that I mean watching loads of Youtube videos where I’m spoon food complex topics and nothing actually hard or challenging. When our family’s vacuum died when I was a young teenager, I asked if I could take it apart to see if I could get it working again. Dissecting this seemingly dead appliance was like taking a basic engineering class. I could see at various steps how mechanical energy was transferred from belts to rotating brushes and everything else that goes along with electric motors. So when I heard about the scuba mod people were doing to their 4Runner’s differential, I had to understand why it was even necessary. And not like the hours of equations my engineering roommate in college used to do. But more like a 5 minute YouTube educational video. Something much more digestible.
At the most fundamental level, I found out the purpose of a vehicle differential. It is basically a method for providing power to wheels that might be rotating at different speeds. For instance, going around a corner, the inside tire would rotate less than the outside tire. Something like Nleft > Nright for a right hand turn. I vaguely remember this being a problem with toy cars I used to play with as a child. How scarred am I to have been forced through a differential-less upbringing?!
This simple yet incredibly brilliant mechanism is housed in that giant steel blob between your rear tires. I’ve heard it affectionately called the differential pumpkin1 housing. The encasing both protects the differential itself and also provides a container for the associated lubricant that keeps everything running smoothly. I was having a difficult time picturing the inside of a differential but luckily stumbled across this video that uses a clear cover where you can peak inside. They even show the behavior of the lubricant at 0, 15, and 30 mph. While I was watching this video I distinctly noticed that the pumpkin isn’t completely full. The top half is simply empty air. When you go fast the lubricant definitely ends up everywhere inside the pumpkin. But the whole thing isn’t necessarily filled to the brim like I thought it would be. Why? Because the air in the pumpkin is a buffer.
Differential breather vents
Heat will be generated from moving mechanical components. For example, if I were to drive for a few hours my differential would heat up. In this case, the heat is transferred from the components of the differential gears to the lubricant, which expands in total volume and pushes extra air out of the differential housing. Once I stop driving, everything will cool off and cause the lubricant to contract, which creates a low pressure state in the housing and allows for the outside higher air pressure to push back in. This transfer of air pressure is able to happen through a differential breather or axle vent. It is basically a little vent on top of your pumpkin that allows air to move and protects against minor splashes and rain water.
This back and forth pressure regulation process works as the Toyota engineer gods intended until you go and do something to mess it all up. Such as crossing a river or flooring it through that deep muddy puddle. Now we have a warm piece of steel that is plunged into icy cold mountain stream water. This will rapidly cool off your differential and create a low pressure state inside the housing. If the water is deep enough or hits just right your breath/vent point could end up fully submerged and it will only be able to draw in water instead of air. It goes without saying that this is not great for your differential.
Differential vent
This is where the scuba modification comes in. It simply moves that vent point to somewhere higher and more protected on the vehicle. There are all-in-one kits available from ARB and you can see a detailed installation log here. Yet the type of plastic the ARB kit uses isn’t ideal in climates where it frequently gets cold. The material will end up becoming brittle and break. This is especially true in the rear area where the plastic line will constantly flex to accommodate vertical travel of the axle in relation to the chassis. Why not instead use something like a fuel line rubber hose, which has a proven track record of being used on vehicles in all types of climates?
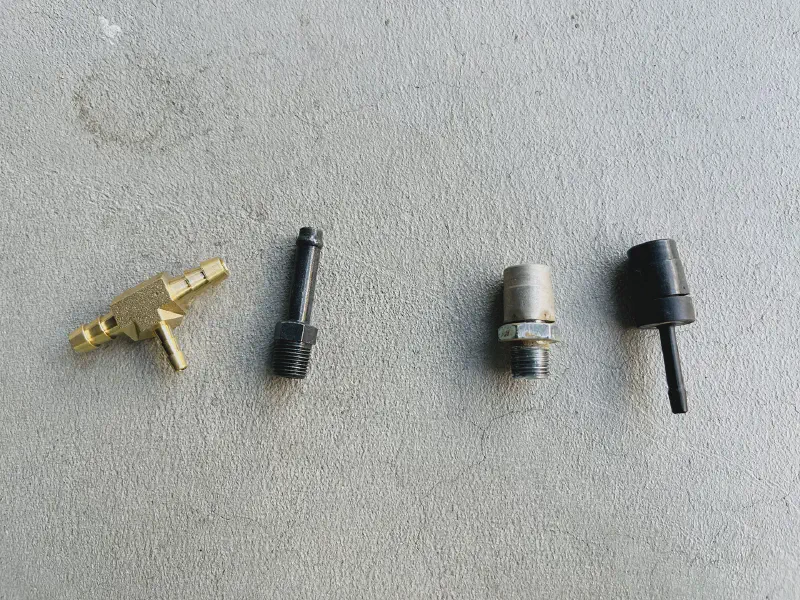
Below is a list of parts needed for moving the differential and e-locker breather points. The main guide I followed was this YouTube video in addition to a similar type installation on a 4Runner forum. I would be dubious about mounting the differential breather inside your fuel cap area because it can get incredibly dusty in there. I instead mounted my breather in the engine compartment behind the driver’s side fuse box.
- Brass Barb Tee Fitting 1/4" x 1/4" x 1/8" - The 2 1/4" ends are for the differential connection and the main air intake. The smaller single 1/8" end connects to the E-Locker output.
- 1/4" Fuel Line at 25ft - I still have a portion of this left over after install. It will be helpful to have on hand in case I go with a higher suspension lift and have to patch in more hose. There are a lot of things you could do with a rubber hose. I used some cut down the middle to be an edge guard on my little propane tank.
- Toyota 90404-51026 Intake Air Control Valve Union - Replaces the differential valve stem. Confirmed fit on 2021 4Runner TRD Off Road.
- Stainless Steel Hose Clamps 3/8" - 5/8" - Used on all connections.
- Mini Oil Air Intake Filter Cleaner - There are a variety of products that would work here. The only requirement is that it has to fit the 1/4" fuel line hose.
- Zip Ties - Purchase from a local hardware store. I doubled these up on points of stress such as turns or spots where there was limited mounting. There is a risk of this plastic eventually breaking but hopefully it will be a while due to the lack of movement.
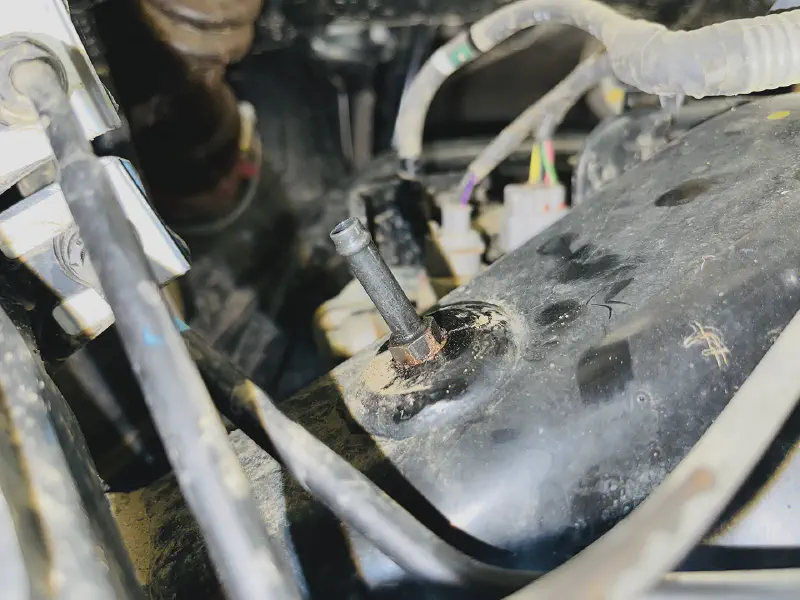
Installation of the mod is very straightforward. Just remember the entire goal is to move the air vent to a safer location. The first step is locating both your differential breather and e-locker breather underneath your 4Runner. The differential breather is pretty easy since it is on the top driver’s side of the pumpkin on your rear axle. The stem has a loose cap and can simply be unscrewed with the appropriately sized wrench. The e-locker breather was slightly higher and mounted on a cross beam on the chassis. I was able to remove the e-locker cap by hand since it is just a simple plastic insert.
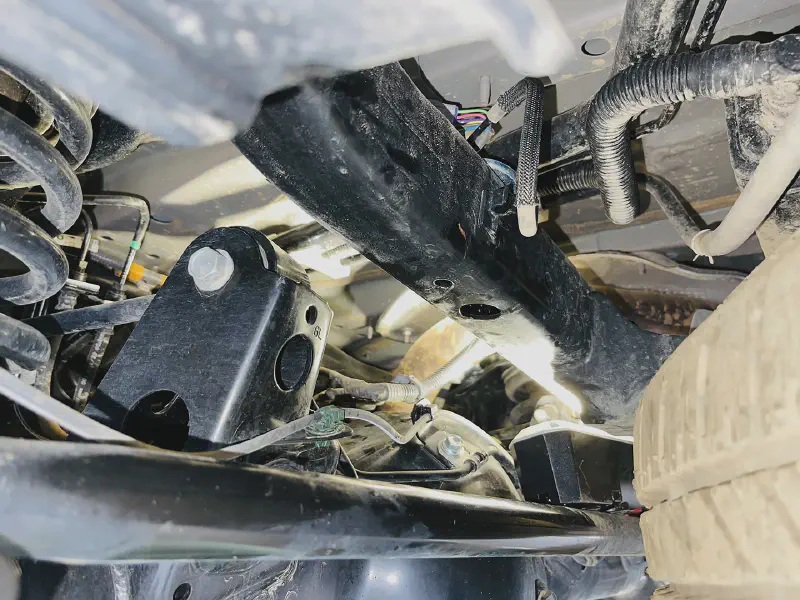
Differential elocker vent location
With both of those removed you have to perform the most complicated part of this modification, which is determining the mount location and hose length for the brass tee. In the end, your differential breather at 1/4" will connect to the brass tee in addition to the e-locker breather at 1/8". The remaining 1/4" brass tee connection is for the line to your new breather location. While the e-locker connection and the hose to your new breather location are mostly static, the connection to your differential vent is very dynamic. Since the differential pumpkin is on the rear axle it will move up and down based on the terrain your vehicle is going over. With that in mind you need to cut your differential vent hose to an appropriate length to accommodate this vertical movement. Also be sure to revisit this hose length in case you install a higher lift, bigger tires, or an extended travel setup.
Next up is routing the rubber hose from the brass tee to the engine bay or where ever you plan on mounting the breather. I don’t have a specific map of where I ran my hose but the general goal is to avoid sources of heat, moving parts, and to stay higher in the chassis to prevent the hose from scrapes.

Differential breather location
Lastly, after you get to a point that is ideal you simply trim the hose and pop on the mini air intake filter. While I have seen some fabricate or re-use a bracket to mount this filter all I did was zip tie it to the main electrical line bracket. The hose and filter and very lightweight and will cause almost no stress on this mount point so I thought it would have been overkill for a dedicated bracket.
With your differential and e-locker breather points now elevated and protected you can rest at ease during your next river or massive puddle encounter. If you are really after it, you might consider your next modification a snorkel to really allow for serious water activities.