Installing the C4 Fabrication Overland Bumper on a 2021 4Runner
As a fair warning to readers, this guide is not meant as a step by step instruction replacement from C4 Fabrication themselves1 or professional Toyota mechanics2. I sincerely recommend consulting the product’s installation guide as a source of definitive information and a variety of community reviews to get a more encompassing image of a potential future project. Please consider this article as more of a personal review and collection of tips for the installation of this product.
Motivation to Install
I used to live in Page, Arizona, which is a far jaunt from any sort of major metropolitan area. Combine that with my wife’s professional obligations and our own family visits it made for hundred of hours of driving. Being so far from civilization increased our risk of hitting wildlife on quiet country roads. The most common were deer. I can’t count the number of times we nearly hit deer while driving in the late evening. It was incredibly stressful to drive portions of U.S. Highway 89 in Southern Utah. Combining the fatigue of the tail end of a six hour drive with the very common risk of a semi-large animal crossing in front of your vehicle made for an exhausting experience. You always had to have your car’s high beams on while you squinted at either side of the road for signs of movement. At the time we drove a VW station wagon, which was a solid German vehicle but left you feeling a but vulnerable since you were low on the road to say a semi-truck or larger SUV.
The danger to human and animal life became so wide spread that the state of Utah built a wildlife highway barrier between Kanab, Utah and Page, Arizona in late 20133. The Utah Department of Transportation estimated that prior to the barrier being erected there were 100 to 105 collisions per year between vehicles and deer. This is a rather low statistic when you consider that over the 5 years following the building of the structure the study associated with the initiative tracked 78,610 mule deer migrating through various access points4. This made the migration project the most successful in the United States. The next comparable migration project was in Nugget Canyon, Wyoming at only approximately 49,000 mule deer.
I would agree that my exposure on Highway 89 was a bit skewed it nonetheless fortified my perception of needing some sort of protection. It wasn’t exactly the first brick in the basis of my feeling. When I was younger my step dad totaled his truck on a highway near Flagstaff, Arizona after hitting an elk. I wasn’t even around when it happened but the images of the aftermath of his truck certainly stayed with me. But after relocating to Salt Lake City, Utah most of these thoughts would lie dormant. Deer became things I only saw on trail runs in the early morning. That was until I purchased my 4Runner and realized I would be returning to many of these country roads and the risk of wildlife collisions along with it.
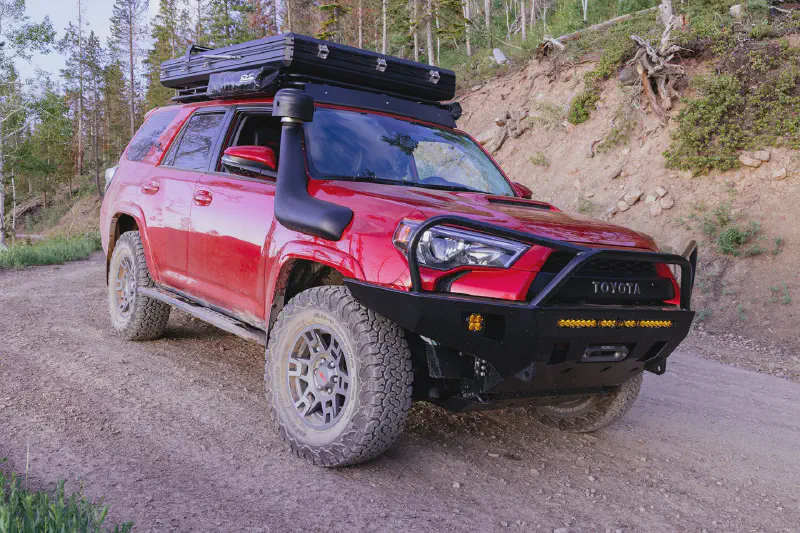
I decided to purchase the C4 Fabrication Overland bumper with full headlight loops to primarily decrease the risk of major damage to my vehicle during a wildlife collision. Many might decry the substantial risk of a vehicle with a high center of gravity and the pronounced rigidity of a steel front bumper during a collision creating more risk. But I understand a portion of this vehicle modification is purely psychological. At the very least I can say that with the bumper’s presence I drive much more deliberately and smoothly as I can feel the weight whenever driving. The secondary reason for getting this bumper is the better approach angles and capacity for future larger tires. My current tire size at 275/70R17 might not seem very large compared to most builds but I am planning an upgrade sometime in 2023 that would suit this aggressive bumper a bit better. The final reason I chose this bumper was purely for vanity. I really enjoy the aggressive look, especially with the associated C4 front skid plate that continues the sharply angled line towards the bottom of the vehicle’s profile. The tires are also exposed from the front on either side that really shows the knobby tread of off road tires.
Preparation
Parts and Tools
- C4 Fabrication 4Runner Overland Series Front Bumper - My options included a 30" light bar cutout, full height bull bar with headlight hoops, and a washer tank skid plate.
- WARN 103253 VR EVO 10-S Winch - The general guideline in sizing a winch would be 1.5 times your vehicle weight. If you wanted more peace of mind it would be very easy to upgrade to the 12-S. I stayed at 10,000 pounds to save some money and also make winch a tad faster since the gearing ratio is different and slower on the 12-S.
- Power Steering Fluid - There are a lot of options available here but to save myself a headache or potential major issue I simply went into my nearby Toyota Dealership and told them what I was doing and they gave me the correct product. They even verified a single bottle was enough to refill my power steering fluid reservoir. Shady Amazon resellers can’t touch that level of confidence.
- Baja Designs S8 Series LED Light Bar - 30" length with amber lenses and the driving/combo pattern.
- Baja Designs Squadron Sport LED Lights - I went with amber lenses and the wide cornering pattern.
- Fog Light Connectors - These H11 H8 connectors allowed me to utilize my OEM 4Runner fog light connector plugs rather than cutting any stock wires.
- 16 and 14 Gauge Wire - There are many cheaper alternatives but these wires are 99.99% copper rather than copper clad aluminum. This will help conductivity but it is required to have complete weather sealing to avoid oxidization. I have seen some solar wires that are aluminum clad copper to avoid weathering but it probably isn’t needed if you have healthy sealing.
- Crimping Tool for Heat Shrink Connectors - In retrospect, I would have actually gotten the crimper in the 8 or 11 piece package because the die is swappable with other crimper dies. This becomes really important if you have plans to add Baja Design lights since they use Weather Pack Connectors.
- Heat Gun - Critical to achieving water tight sealing on your cabling connections. This thing eats batteries like no one’s business. Maybe consider a corded version.
- Heat Shrink Tubing Kit - Make sure all the components you are buying is Marine Grade. You vehicle is exposed to a great deal of environmental variation and all this stuff needs to hold up. This Wirefy brand seems to be universally respected, even within the DIY Solar community.
- Heat Shrink Wire Connector Kit - I got the large 540 piece kit since I will be using it for my own future modifications and other electronics I setup around the house.
- Wire Strippers - Having decent wire strippers is critical for your sanity since this project requires a ton of wire stripping. If you plan on doing a lot more of your own electrical work in the future it would be helpful to upgrade to a more elegant stripper 😏 like the Klein 11063W.
- Dymo Label Maker - Labelling your cables makes it look both professional and also keeps everything organized. When you are working on something in months or years in the future you will know exactly what goes where.
- Heat Shrink Tube Labels - Many of the off-brand suppliers are good quality and are considerably cheaper than Dymo specific. Most of my labels were either 1/2" or 3/4".
New Bumper Preparation
Since C4 Fabrication does not powder coat any of their products I actually shipped the bumper directly to a local company rather than to my house. This saves the hassle of a double trip to and from your house to the powder coating company. After I got the bumper back I inspected the entire surface area for any missed sections. There were a few spots that I could tell were used to hang the bumper during powder coating application and subsequently were not properly covered. It was an easy fix to do a couple coats of spray paint on those spots to discourage any rust from starting. There are lot of nooks and crannies on this bumper that aren’t easily reachable once installed so this step is key before installing.
Installing lights and winch on new bumper
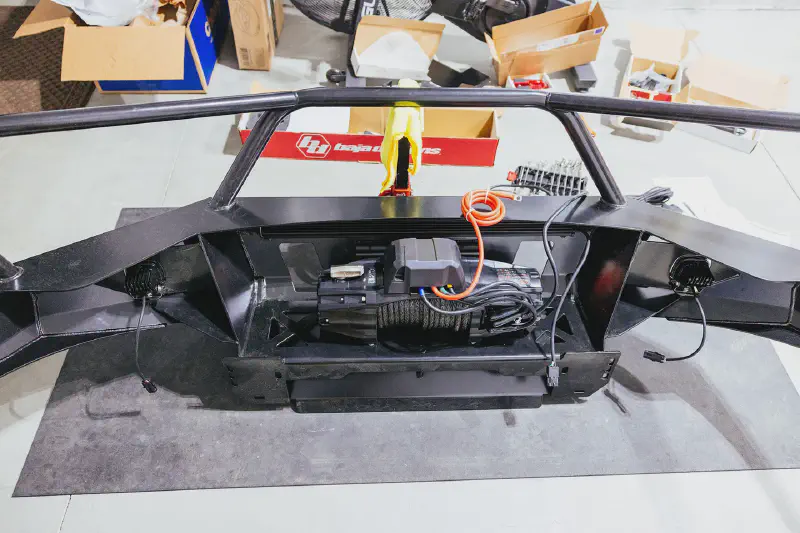
I set up my bumper on a rubber pad in my garage with a floor jack holding up the front to somewhat mimic the orientation of being installed. Having the bumper semi-upright helped a lot when aiming the thirty inch light bar and fog lights. While the bumper wasn’t perfectly level I simply went off the winch bottom mounting plate to get a sense of what a true ninety degree angle would look like after installation. Getting the lights on the bumper was very straightforward and the only time consuming portion was simply getting the light angle as correct as I thought possible. There are some slots built into the bumper that allow for interior access even after installation but the angles for applying tools to bolts are not very forgiving. So it is best to get things right before rather than depending on afterward.
For the positioning of the winch I regret not positioning it closer to the vehicle. I was worried about clearing the radiator and air conditioning lines so I placed it as far forward as possible. I think this contributes slightly to some vibrations I am seeing with the bumper on extremely rough roads due to the fact that the heavy weight of the bumper is not directly in line with main bolt location. In other words, the center of gravity of the winch overhangs out to the front a bit when if it was closer to the vehicle it would be more in line with the support of the OEM bumper bolts. Regardless, I plan on adjusting this in the future when I have my front skid plate off. The two front bolts of the winch are exposed with slots in the bumper but the rear can only be accessed by angling in a tool near the skid plate area. So depending on your skid plate setup you might have easier or harder access to those rear winch bolts once the bumper is on your vehicle.
Marking the Cutting Line
Before removing anything from the 4Runner I measured and marked on the bumper for where it would be required to later cut. Describing the locations and points of measurements with words would be rather difficult so I would strongly encourage watching C4’s video or Timmy the Toolman’s. Keep in mind that the general goal of this step is simply to have a horizontal flat cut through your plastic bumper with about a half inch gap between the plastic bumper and the new steel bumper.
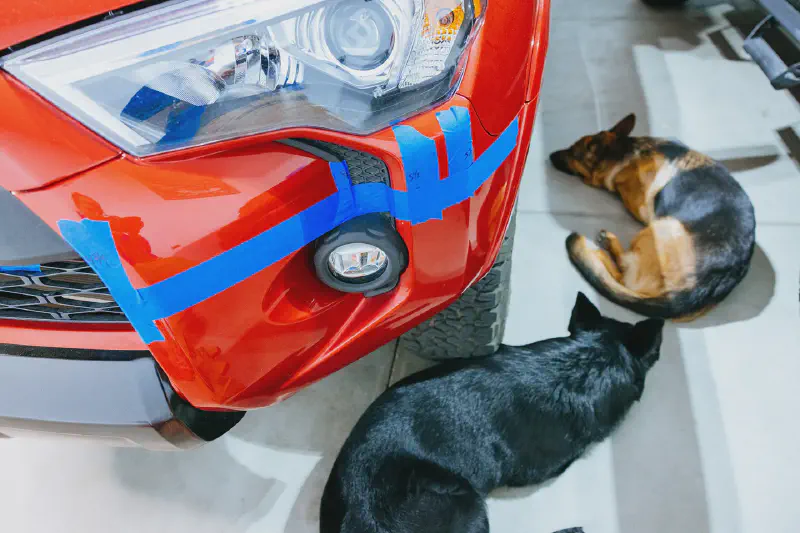
Measuring before cutting
TSS Sensor Relocation
One thing to note is that my 4Runner had a slightly different center mesh setup that most I saw. There was actually a mounting location for my vehicle’s TSS sensor right in the center of the plastic mesh, which had to be cut through in order to achieve the same horizontal line across. Luckily, the TSS sensor itself can be unplugged and put to the side in order to avoid the risk of cutting through it. I thought this prudent considering a Toyota Technician at the dealership told me it was a pretty expensive part to replace.
There was no new location to mount the TSS sensor so I simply zip-tied it back to the plastic bumper at reasonable angle. I chose a position above the bulk of the steel in the new bumper but lower than the headlight loops. The goal was to have the sensor have some sort of unobstructed view in front of the vehicle. I have had a lot of problems with the sensor erroring out while driving in this rudimentary location and thought I would be forever plagued with these notifications in the driver’s LED screen.
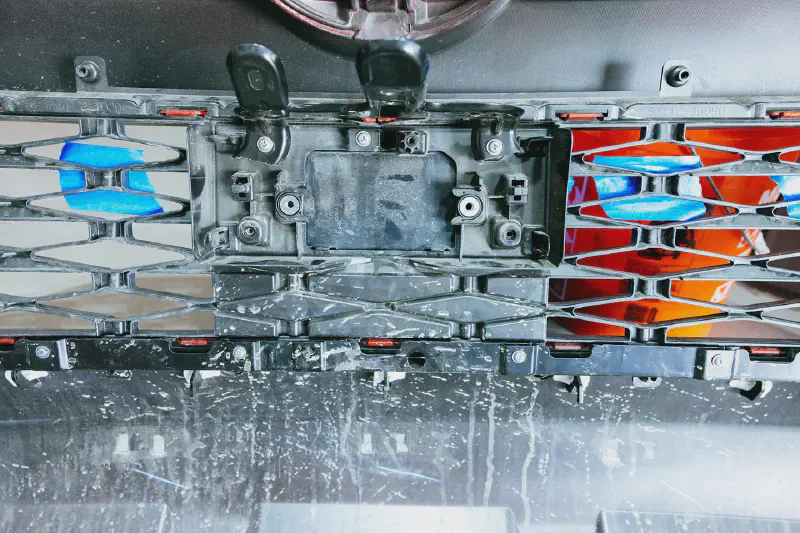
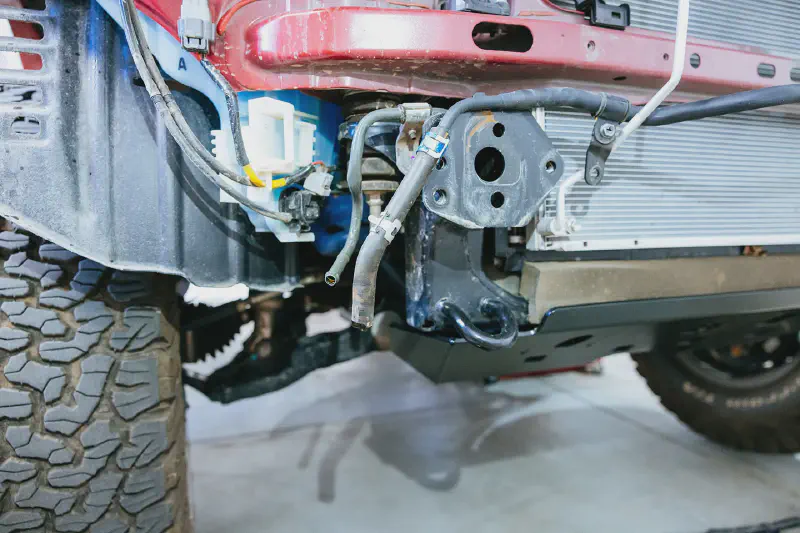
4Runner TSS OEM mount
However, during the summer of 2022, C4 Fabrication began offering a TSS relocation bracket5 that I intend on purchasing in the near future. I can’t vouch for how successful the bracket would make TSS perform but I do know that TSS can be re-calibrated if you take it into a Toyota Dealership. While I never expect to regain a factory performance of TSS I certainly hope one day I can have it perform at least reasonably well enough to stop constantly erroring and disabling itself.
Disassembling the Stock Bumper
Once I had my lines marked on the plastic portion of the bumper I began removing most of the front bumper. Most components were surprising easily to remove and I followed the instructions outlined by C4 Fabrication. The hardest part were the bracket tabs connecting the plastic bumper to the wheel wells. These screw tabs have been forever my enemy over the course of several other modifications. I find myself looking up videos about their removal6 every time I encounter them, which helps quite a bit in avoiding breaking them or becoming irrationally angry.
Power Steering
Out of all the steps of installing this new C4 Fabrication Overland bumper the power steering portion is what intimidated me the most. I can easily bolt brackets here and there or custom wire things with specialized deutsch connectors but messing with the factory power steering lines took me out of my comfort zone. The premise of installing this third party power steering cooling reservoir is to achieve a greater clearance for the new bumper to sit tighter to your vehicle. Without it I would be faced with an aluminum line directly in line with where the winch sits on the new steel bumper. In an effort to avoid performing this step I looked around at other people’s installations where they didn’t add the new power steering reservoir. I only found a few examples but the amount of bending required in the stock power steering lines gave me some hesitancy. Would I rather have a third party power steering cooling reservoir with proven performance or push my OEM power steering aluminum lines to their limit? Ultimately, I decided to leave my comfort zone and install the new reservoir.
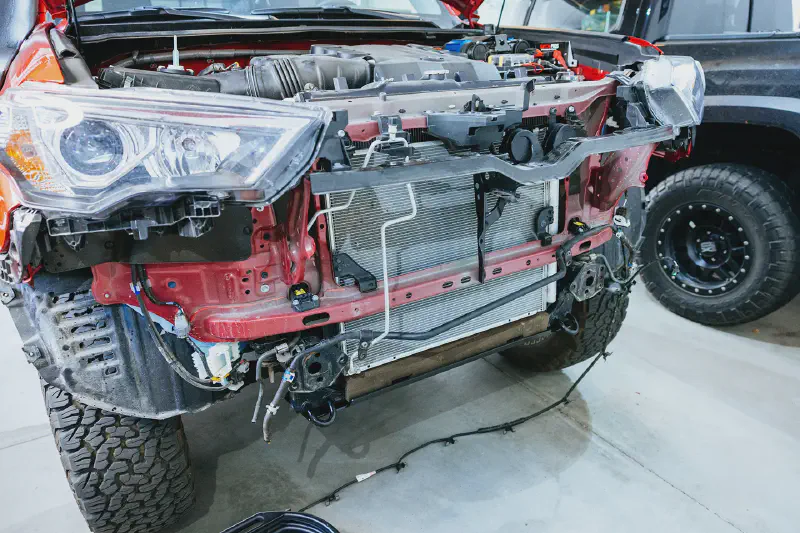
4Runner without front bumper
After removing the bulk of the stock bumper you can see the power steering line going across in front of the radiator and the subsequent need to have it relocated. I’m not sure why the Toyota 4Runner has so much open space in the front area but the designing engineers certainly embraced all the open area to seemingly run the power steering cooling line as far out from the radiator as possible. Perhaps there are certain lengths required for the air dams to perform effectively that made the stock bumper have so much room in the front but I really don’t know.
Removing the stock power steering cooling line involves jettisoning all the metal portions while keeping the rubber parts that are located more within the interior of the engine bay. These lines are of course filled with power steering fluid so draining them is a requirement. The way to perform this drainage in the most controlled manner is to locate the L sections of the metal lines on either side of bumper. Approaching one side first you simply undo the metal line at that junction and thereafter use a flathead screwdriver inserted into the line to leverage bending it so that it points downward. The bulk of the fluid should drain with this method and it should be repeated on both sides. Keep in mind that to eek out the last little bits of fluid you can turn the vehicle’s steering wheel back and forth to work liquid through the line. The car should not be turned on during this step to avoid damaging the power steering fluid pump.
Removing power steering Lines and fluid
After the metal lines are remove and the fluid is drained you can begin the installation of the new power steeling cooling reservoir. I located the reservoir to the lower left of the radiator if you were facing the vehicle. The location was fine with the provided power steering rubber hose replacements. The two foot hose went out from the top of the reservoir up to the left to meet directly with the main vehicle reservoir. The other hose was slightly longer at forty-eight inches and came out of the bottom of the reservoir bending over the top and going across the radiator to the right to meet up with the old location of the power steering line location to reform the closed loop. Getting the hoses onto the reservoir apparatus is greatly helped by adding a little power steering fluid coating to lubricate the hose coupling. Additionally, I took cut up sections of the old hose to create small protective rubber sleeves for the new hose at points where abrasion would become a problem.
During the preparation stage for this project I looked up various types of power steering fluids that were compatible with the 4Runner. There were quite a variety of results and available products that were kind of overwhelming. To avoid any mishap by introducing a non-compatible fluid I simply visited my local Toyota Dealership. They were able to lookup the exact fluid I needed and also the exact number of ounces required to completely refill the new cooling loop.

New power steering radiator
Adding power steering fluid back into the vehicle is easy but requires a bit of massaging. While the 4Runner was still off I poured in enough to hit the fill line in the main engine bay power steering reservoir. After I hit that line I turned the steering wheel back and forth to work liquid into the cooling line. This might make the reservoir gurgle a bit and splash a bit of power steering fluid our if the cap isn’t full covering the top opening. Repeating this process a few times until I hit the fill line I finally turned the vehicle on and repeated the same process with the help of the power steering fluid pump helping out. A final tip would be to check the power steering level after driving around the block for a bit and also after your next longer drive over fifty or one-hundred miles.
Before moving on from this step I made sure to gently bend the air conditioning line that sits in front of the radiator. I wanted as much room for the internal components and the steel bumper itself to sit flush with the vehicle. This provides the greatest approach angle from the bumper and also gives greater room for access components of the winch if any future maintenance is needed. The aluminum line is firm but not immovable. I was strong but careful in pushing it back into the vehicle in order to avoid any crimps or excessive bending that would lead to a small leak.
Cutting
Up until this point I had been only modifying the internals of my 4Runner and it was finally time to bring the front bumper under the knife. This part had me slightly stressed but for some reason the power steering relocation was the larger mountain for me to climb. Cutting in a straight line was seemingly not too difficult but proved to be rather tricky. I ended up going with the recommendation from the C4 Fabrication installation video by using the angle grinder to cut through the plastic bumper. I do own a Dremel tool and also a reciprocating saw, which is what Timmy the Toolman used in their installation. Based on the size and approach angle of the Dremel tool it did not feel like I could get a flat angle while cutting across. The cutting disk simply did not extend far enough. On the other side of the spectrum I felt that the reciprocating saw had too much lateral movement while cutting and wouldn’t give enough control to get a clean line.
Ultimately going with the angle grinder proved effective but there were a few caveats during cutting that I wanted to note. Due to the round shape of the grinder blade it became hard to approach the indents of the plastic bumper. In some cases I had to approach from the front and back in multiple phases in order to get the cut fully into the bumper. Another issue I experienced was that if I went too slow during the cut the angle grinder blade would heat up considerably and melt parts of the plastic bumper. This would cause some plastic to collect into clumps along the edge of the reveal. Breaking them off was simple and easy but in some cases it would chip the paint in small bits. I probably wouldn’t have had this heating problem with a reciprocating saw but I certainly got more control by cutting with the angle grinder. To clean up the edge after cutting simply involves using a file along the rough parts to bring everything absolutely even and smooth.
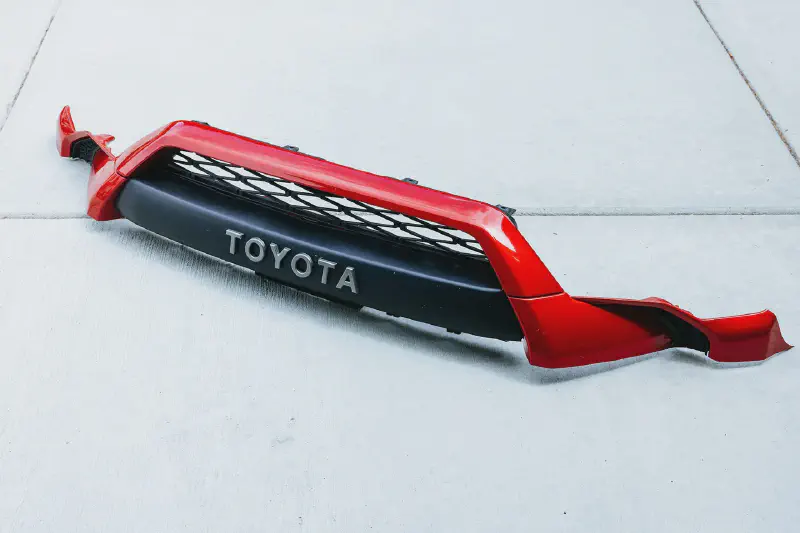
Plastic bumper after trimming
After completing the cut of the bumper you might consider adding some sort of edge trim7 to the bottom of the plastic bumper. The sort with a heat activated adhesive would work best to stay in place. This could help discourage any paint chipping or wear on the plastic edging now that it has been damaged by aftermarket cutting. I actually did not add any edge trimming but I plan to in the near future to specifically avoid any further paint chipping at the plastic bumper edges.
Mounting the Bumper
Getting the bumper up onto my 4Runner definitely required a second pair of hands. In addition, I used a hydraulic jack in the center to help support the bulk of the weight to avoid physical strain. With the jack in the center both myself and the person helping me only really had to focus on balancing the steel bumper while we adjusted angle and height to get it on the vehicle. One tip I found invaluable from C4 was to thread the top bolt of the bumper mounting point in backwards. Having these bolts sticking out towards the front gives a perfect spot to hang the bumper up on while you add in the other bolts in the correct direction.
Once all the main and supporting bolts are in place you want to make sure the new steel bumper is balanced across both sides of the vehicle and the gap between itself and the plastic bumper is equal at all parts. The guideline from C4 was to have about a half inch gap between the two in order to allow for flexing while off-roading and other unique vehicle situations. A half inch might look a bit too much when you are near the vehicle but if you step back a bit it all blends in together and is less obvious. I went for a gap slightly smaller than a half inch and I can already see some rubbing on either side of the steel bumper from coming into contact with the plastic bumper trim above.

Trimming the mudflaps
I started trimming the mudflap area prior to mounting the new steel bumper but only finished afterwards. This was due to seeing the profile of the bumper in comparison to the level of trimming I had been doing on the mudflap area. I also added a few zip ties in key spots to keep the plastic from flopping around. This isn’t specifically needed since the plastic is so rigid but does help increase the coverage of the mudflaps now that my tires were fully exposed. I am sure things will get incredibly muddy in that area of the vehicle so keeping some level of mudflap coverage is helpful, especially when preventing the elements from getting into your engine bay or near semi-critical components.
Wiring
To have a trim wiring setup with the new fog lights to the OEM connectors I bought some pre-wired H11 connectors8. On the other end of those I added the Delphi Weatherpack connectors in order to connect to the Baja Squadron Sport plugs. The result was a small footprint connector that didn’t involve cutting the OEM fog log connections. Any slack in the wiring was simply zip-tied up a bit to get away from direct mud exposure.
2014+ 4runner Front Bumper Installation Guide by C4 Fabrication ↩︎
C4 Fabrication Front Bumper Install - 5th Gen 4runner (Part 1) by Timmy The Toolman and C4 Fabrication Front Bumper Install - 5th Gen 4runner (Part 2) by Timmy The Toolman ↩︎
[UDOT builds fence near Kanab to prevent car versus deer collisions] (https://www.ksl.com/article/25120824/udot-builds-fence-near-kanab-to-prevent-car-versus-deer-collisions) ↩︎
U.S. Highway 89 Kanab-Paunsaugunt Wildlife Crossing and Existing Structures Research ↩︎